手写签名功能(vue3)
效果
显示效果
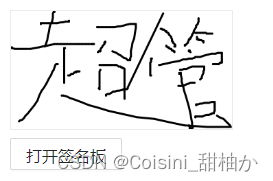
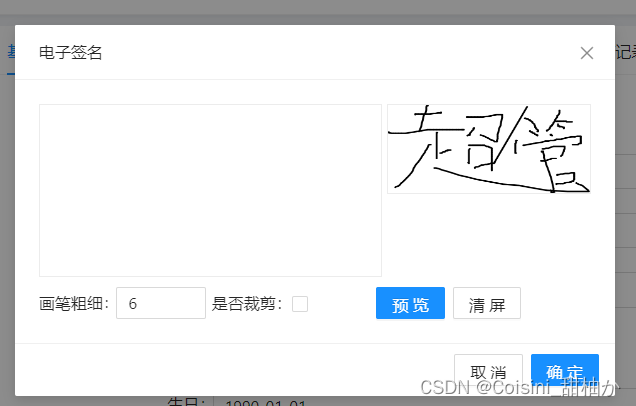
签名版效果
代码
- 代码引入
写成子组件形式,直接引入即可
<signature-features />
- 代码结构
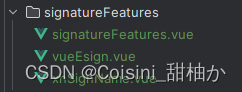
signatureFeatures:签名的显示效果
vueEsign:画板
xnSignName:打开签名后的modal框 - 文件代码
signatureFeatures:
<template>
	<div>
		<div class="mb-2" v-if="userInfo.signature">
			<a-image :src="userInfo.signature" style="height: 120px; border: 1px solid rgb(236 236 236)" />
		</div>
		<a-button @click="XnSignNameRef.show()">打开签名板</a-button>
		<xn-sign-name ref="XnSignNameRef" :image="userInfo.signature" @successful="signSuccess" />
	</div>
</template>

<script setup>
	import { ref } from 'vue'
	import tool from '@/utils/tool'
	import userCenterApi from '@/api/sys/userCenterApi'
	import store from '@/store'
	import XnSignName from '@/views/sys/user/userTab/signatureFeatures/xnSignName.vue'
	const userInfo = ref(tool.data.get('USER_INFO'))
	const XnSignNameRef = ref()
	// 签名板组件回调
	const signSuccess = (value) => {
		const param = {
			signature: value
		}
		userCenterApi.userUpdateSignature(param).then(() => {
			userInfo.value.signature = value
			// 更新缓存
			tool.data.set('USER_INFO', userInfo.value)
			store.commit('SET_userInfo', userInfo.value)
		})
	}
</script>

<style scoped></style>
xnSignName:
<template>
	<a-modal ref="signModel" v-model:visible="visible" :width="600" title="电子签名" @cancel="handleClear" @ok="handleOk">
		<a-row :gutter="5">
			<a-col :span="15">
				<div style="border: 1px solid rgb(236 236 236)">
					<vue-esign
						ref="esign"
						v-model:bgColor="bgColor"
						:width="800"
						:height="400"
						:is-crop="isCrop"
						:line-width="lineWidth"
						:line-color="lineColor"
					/>
				</div>
			</a-col>
			<a-col :span="9">
				<div style="height: 90px; width: auto">
					<img :src="resultImg" style="height: 90px; width: 100%; border: 1px solid rgb(236 236 236)" />
				</div>
			</a-col>
		</a-row>
		<div style="margin-top: 10px">
			<a-space>
				<a-form>
					<a-row :gutter="16">
						<a-col :span="12">
							<a-form-item label="画笔粗细:">
								<a-input-number v-model:value="lineWidth" :min="1" :max="20" />
							</a-form-item>
						</a-col>
						<a-col :span="12">
							<a-form-item>
								<div style="padding-right: 50px">是否裁剪:<a-checkbox v-model:checked="isCrop"></a-checkbox></div>
							</a-form-item>
						</a-col>
					</a-row>
				</a-form>
				<a-button type="primary" @click="handleGenerate">预览</a-button>
				<a-button @click="handleReset">清屏</a-button>
			</a-space>
		</div>
	</a-modal>
</template>

<script setup>
	import { message } from 'ant-design-vue'
	import VueEsign from '@/views/sys/user/userTab/signatureFeatures/vueEsign.vue'
	const signModel = ref(false)
	const visible = ref(false)
	const esign = ref(false)
	const resultImg = ref('')
	const isCrop = ref(false)
	const lineWidth = ref(6)
	const lineColor = ref('#000000')
	const bgColor = ref('')
	const props = defineProps(['image'])
	// eslint-disable-next-line vue/no-setup-props-destructure
	resultImg.value = props.image
	const emit = defineEmits({ successful: null })
	const show = () => {
		visible.value = true
	}
	const handleReset = () => {
		esign.value.reset()
		resultImg.value = ''
	}
	const handleGenerate = () => {
		esign.value
			.generate()
			.then((res) => {
				resultImg.value = res
			})
			.catch(() => {
				message.warning('无任何签字')
			})
	}
	const handleClear = () => {
		visible.value = false
	}
	const handleOk = () => {
		esign.value
			.generate()
			.then((res) => {
				emit('successful', res)
				handleClear()
			})
			.catch(() => {
				message.warning('无任何签字')
			})
	}
	defineExpose({
		show
	})
</script>

<style scoped>
	.ant-form-item {
		margin-bottom: 0px !important;
	}
</style>
vueEsign:
<!--
本插件来源于:https://github.com/JaimeCheng/vue-esign#readme
因为集成进来跟我的Vue版本不一致,打包出问题,所以集成源码方式,感谢作者的源码
-->
<template>
	<canvas
		ref="canvas"
		@mousedown="mouseDown"
		@mousemove="mouseMove"
		@mouseup="mouseUp"
		@touchstart="touchStart"
		@touchmove="touchMove"
		@touchend="touchEnd"
	></canvas>
</template>

<script>
	export default {
		props: {
			width: {
				type: Number,
				default: 800
			},
			height: {
				type: Number,
				default: 300
			},
			lineWidth: {
				type: Number,
				default: 4
			},
			lineColor: {
				type: String,
				default: '#000000'
			},
			bgColor: {
				type: String,
				default: ''
			},
			isCrop: {
				type: Boolean,
				default: false
			},
			isClearBgColor: {
				type: Boolean,
				default: true
			},
			format: {
				type: String,
				default: 'image/png'
			},
			quality: {
				type: Number,
				default: 1
			}
		},
		data() {
			return {
				hasDrew: false,
				resultImg: '',
				points: [],
				canvasTxt: null,
				startX: 0,
				startY: 0,
				isDrawing: false,
				sratio: 1
			}
		},
		computed: {
			ratio() {
				return this.height / this.width
			},
			stageInfo() {
				return this.$refs.canvas.getBoundingClientRect()
			},
			myBg() {
				return this.bgColor ? this.bgColor : 'rgba(255, 255, 255, 0)'
			}
		},
		watch: {
			myBg: function (newVal) {
				this.$refs.canvas.style.background = newVal
			}
		},
		beforeMount() {
			window.addEventListener('resize', this.$_resizeHandler)
		},
		// eslint-disable-next-line vue/no-deprecated-destroyed-lifecycle
		beforeDestroy() {
			window.removeEventListener('resize', this.$_resizeHandler)
		},
		mounted() {
			const canvas = this.$refs.canvas
			canvas.height = this.height
			canvas.width = this.width
			canvas.style.background = this.myBg
			this.$_resizeHandler()
			// 在画板以外松开鼠标后冻结画笔
			document.onmouseup = () => {
				this.isDrawing = false
			}
		},
		methods: {
			$_resizeHandler() {
				const canvas = this.$refs.canvas
				canvas.style.width = this.width + 'px'
				const realw = parseFloat(window.getComputedStyle(canvas).width)
				canvas.style.height = this.ratio * realw + 'px'
				this.canvasTxt = canvas.getContext('2d')
				this.canvasTxt.scale(Number(this.sratio), Number(this.sratio))
				this.sratio = realw / this.width
				this.canvasTxt.scale(1 / this.sratio, 1 / this.sratio)
			},
			// pc
			mouseDown(e) {
				e = e || event
				e.preventDefault()
				this.isDrawing = true
				this.hasDrew = true
				let obj = {
					x: e.offsetX,
					y: e.offsetY
				}
				this.drawStart(obj)
			},
			mouseMove(e) {
				e = e || event
				e.preventDefault()
				if (this.isDrawing) {
					let obj = {
						x: e.offsetX,
						y: e.offsetY
					}
					this.drawMove(obj)
				}
			},
			mouseUp(e) {
				e = e || event
				e.preventDefault()
				let obj = {
					x: e.offsetX,
					y: e.offsetY
				}
				this.drawEnd(obj)
				this.isDrawing = false
			},
			// mobile
			touchStart(e) {
				e = e || event
				e.preventDefault()
				this.hasDrew = true
				if (e.touches.length === 1) {
					let obj = {
						x: e.targetTouches[0].clientX - this.$refs.canvas.getBoundingClientRect().left,
						y: e.targetTouches[0].clientY - this.$refs.canvas.getBoundingClientRect().top
					}
					this.drawStart(obj)
				}
			},
			touchMove(e) {
				e = e || event
				e.preventDefault()
				if (e.touches.length === 1) {
					let obj = {
						x: e.targetTouches[0].clientX - this.$refs.canvas.getBoundingClientRect().left,
						y: e.targetTouches[0].clientY - this.$refs.canvas.getBoundingClientRect().top
					}
					this.drawMove(obj)
				}
			},
			touchEnd(e) {
				e = e || event
				e.preventDefault()
				if (e.touches.length === 1) {
					let obj = {
						x: e.targetTouches[0].clientX - this.$refs.canvas.getBoundingClientRect().left,
						y: e.targetTouches[0].clientY - this.$refs.canvas.getBoundingClientRect().top
					}
					this.drawEnd(obj)
				}
			},
			// 绘制
			drawStart(obj) {
				this.startX = obj.x
				this.startY = obj.y
				this.canvasTxt.beginPath()
				this.canvasTxt.moveTo(this.startX, this.startY)
				this.canvasTxt.lineTo(obj.x, obj.y)
				this.canvasTxt.lineCap = 'round'
				this.canvasTxt.lineJoin = 'round'
				this.canvasTxt.lineWidth = this.lineWidth * this.sratio
				this.canvasTxt.stroke()
				this.canvasTxt.closePath()
				this.points.push(obj)
			},
			drawMove(obj) {
				this.canvasTxt.beginPath()
				this.canvasTxt.moveTo(this.startX, this.startY)
				this.canvasTxt.lineTo(obj.x, obj.y)
				this.canvasTxt.strokeStyle = this.lineColor
				this.canvasTxt.lineWidth = this.lineWidth * this.sratio
				this.canvasTxt.lineCap = 'round'
				this.canvasTxt.lineJoin = 'round'
				this.canvasTxt.stroke()
				this.canvasTxt.closePath()
				this.startY = obj.y
				this.startX = obj.x
				this.points.push(obj)
			},
			drawEnd(obj) {
				this.canvasTxt.beginPath()
				this.canvasTxt.moveTo(this.startX, this.startY)
				this.canvasTxt.lineTo(obj.x, obj.y)
				this.canvasTxt.lineCap = 'round'
				this.canvasTxt.lineJoin = 'round'
				this.canvasTxt.stroke()
				this.canvasTxt.closePath()
				this.points.push(obj)
				this.points.push({ x: -1, y: -1 })
			},
			// 操作
			generate(options) {
				let imgFormat = options && options.format ? options.format : this.format
				let imgQuality = options && options.quality ? options.quality : this.quality
				const pm = new Promise((resolve, reject) => {
					if (!this.hasDrew) {
						reject(`Warning: Not Signned!`)
						return
					}
					var resImgData = this.canvasTxt.getImageData(0, 0, this.$refs.canvas.width, this.$refs.canvas.height)
					this.canvasTxt.globalCompositeOperation = 'destination-over'
					this.canvasTxt.fillStyle = this.myBg
					this.canvasTxt.fillRect(0, 0, this.$refs.canvas.width, this.$refs.canvas.height)
					this.resultImg = this.$refs.canvas.toDataURL(imgFormat, imgQuality)
					var resultImg = this.resultImg
					this.canvasTxt.clearRect(0, 0, this.$refs.canvas.width, this.$refs.canvas.height)
					this.canvasTxt.putImageData(resImgData, 0, 0)
					this.canvasTxt.globalCompositeOperation = 'source-over'
					if (this.isCrop) {
						const crop_area = this.getCropArea(resImgData.data)
						var crop_canvas = document.createElement('canvas')
						const crop_ctx = crop_canvas.getContext('2d')
						crop_canvas.width = crop_area[2] - crop_area[0]
						crop_canvas.height = crop_area[3] - crop_area[1]
						const crop_imgData = this.canvasTxt.getImageData(...crop_area)
						crop_ctx.globalCompositeOperation = 'destination-over'
						crop_ctx.putImageData(crop_imgData, 0, 0)
						crop_ctx.fillStyle = this.myBg
						crop_ctx.fillRect(0, 0, crop_canvas.width, crop_canvas.height)
						resultImg = crop_canvas.toDataURL(imgFormat, imgQuality)
						crop_canvas = null
					}
					resolve(resultImg)
				})
				return pm
			},
			reset() {
				this.canvasTxt.clearRect(0, 0, this.$refs.canvas.width, this.$refs.canvas.height)
				if (this.isClearBgColor) {
					this.$emit('update:bgColor', '')
					this.$refs.canvas.style.background = 'rgba(255, 255, 255, 0)'
				}
				this.points = []
				this.hasDrew = false
				this.resultImg = ''
			},
			getCropArea(imgData) {
				var topX = this.$refs.canvas.width
				var btmX = 0
				var topY = this.$refs.canvas.height
				var btnY = 0
				for (var i = 0; i < this.$refs.canvas.width; i++) {
					for (var j = 0; j < this.$refs.canvas.height; j++) {
						var pos = (i + this.$refs.canvas.width * j) * 4
						if (imgData[pos] > 0 || imgData[pos + 1] > 0 || imgData[pos + 2] || imgData[pos + 3] > 0) {
							btnY = Math.max(j, btnY)
							btmX = Math.max(i, btmX)
							topY = Math.min(j, topY)
							topX = Math.min(i, topX)
						}
					}
				}
				topX++
				btmX++
				topY++
				btnY++
				const data = [topX, topY, btmX, btnY]
				return data
			}
		}
	}
</script>

<style scoped>
	canvas {
		max-width: 100%;
		display: block;
	}
</style>


![[论文笔记]Root Mean Square Layer Normalization](https://img-blog.csdnimg.cn/img_convert/ebea04d0e75943d4b3eeb5b2449b92db.png)